2016年4月8日
他人の書いたコードに挑もう – Part 1
(2016-03-15)by Li Haoyi
本記事は、原著者の許諾のもとに翻訳・掲載しております。
この記事では、他人が書いたコードを扱うための練習法を一から説明します。目標は、 Spyder Python IDE という今まで触ったこともないプロジェクトのコードに任意の変更を加え、途中で行き詰ることなく、目的達成に必要な情報 のみ 習得することです。ここでは、勘や実験的な手段、そしてプロの現場で養った洞察力を武器に問題に対処する方法を学びます。形式ばったレッスンのように、苦痛を感じることはないでしょう。満足感や挫折、葛藤を味わいながらプロジェクトを進め、最終的には(なんとか動く程度の)パッチを完成させ、大規模で不慣れなコードベースに機能を追加します。
プログラミングを学んでいる人は皆、あらゆる種類のプログラムで大量のコードを書いています。それは、問題集に載っているアルゴリズムを実装するにせよ、ウェブサイトの構築やビデオゲームの作成をするにせよ同じです。ところがプロのソフトウェアエンジニアというのは、めったに コードをガリガリ書きません 。それよりも他人のコードの解読に時間を割いています。解読するのは自分で書いたものでもなければ、今まで一度も見たこともないような、良く分からないコードです。助けを求める人や、心の叫びに気付いてくれる人がいなくても、前に進まなければならないのです。
目標
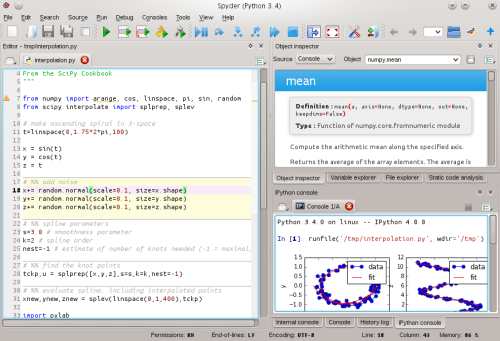
この記事の目標は、初見のコードベースの内容を調査して、ある程度インパクトのある修正を加えることです。この練習で使用するターゲットは、 Spyder Python IDE で、Githubのページによると見た目は以下のような感じです。

そして(任意の)目標は、 Help ドロップダウンメニューの隣に Misc という名称のドロップダウンを新しく追加することです。その内部には、現在開いているテキスト領域を取得して、以下のコードを先頭に追加するメニューアイテムおよびコマンドを追加します。
print("Running %s" % __name__)ファイルの実行開始時間を表示するため、一番上に挿入します。
私は職業柄、何年もPythonやJavaScriptを使ってきたので、これらのエコシステムについてはかなりの知識があります。Bashコマンドラインを使うLinuxの作業環境にも精通していて、オープンソース拡張も数多くこなしてきました。遠い昔にはJavaやC#、PHPもよく使っていました。ただ、Spyderエディタは一度も使ったことがなく、コードベースに触れるのも、実際に見るのも今日が初めてです。この練習では、このように何の知識もないコードベースを使い始める方法や、全てを把握せずとも前へ進む方法を模索します。
方針
以下は、未知のコードベースを扱う上での作業手順です。
- 明らかにする :ドキュメントにざっと目を通して、プロジェクトの概要や処理を大まかに捉える。
- インストール :何とかしてプロジェクトをローカルで動かす。
- 慣れる :コードベースの全体をざっと見て、どこで何の処理をしているかを把握する。
- Hello World :実行するコードに軽微な変更を加えて、その影響を確認する。
- 繰り返す :コードをいじって、より多くの機能を動かす。
- まとめ
以下は、他人のコードを扱う際の留意点です。
-
プロジェクトの内容を把握しましょう。今回扱うのは、Scientific Python 用のグラフィカルなIDEの一種です。ありがたいことに、私は Scientific Pythonの使用経験はありませんが、IDEとPythonは知っています。より専門的な使い方をするプロジェクトの場合は、着手前にその 目的 を把握しておきましょう。
-
放棄されたプロジェクトや、長い間使用されていないプロジェクトでない限り、おそらくコードは動きます。Spyderの場合、最終コミットは ごく最近 です。そのコードで作業をして修正を加えた人がいるということは、コードが十分に動作する証しです。
-
コードを修正して動作確認をするため、 何らかの 方法で「開発」用にセットアップする必要があります。この点が「配布用に全てセットになったバンドル」版とは違うところでしょう。
-
放棄されたプロジェクトや、一個人が作成したプロジェクト(その開発者のデスクトップ上にしかない特殊な環境を準備する必要がある場合)を除いて、セットアップは 可能 です。この記事で扱うのは、複数の人によって頻繁に開発されているプロジェクトなので、たとえセットアップに苦戦したとしても、それが 可能である ことは確かです。
-
セットアップに時間がかかっても大丈夫です。コードがゴチャゴチャに膨れ上がり、高度な設定を要する場合は、セットアップに「数日」かかるケースもあります。少し長いですが、珍しいことではありません。私が初めて PHP と MySQL をインストールした時は9時間かかりました。理想的には IPython プロジェクトのように、数秒で開発環境をセットアップしたいところですが、そう都合良く単独で動作し、依存性がないプロジェクトばかりではありません。
明らかにする
プロジェクトの概要や動作が全く分からない状態で、手を加えようとするのは無謀です。なお、この記事で扱うのは、 Spyder Python IDE です。
Githubのページの概要にあるように、これはPython 用に Pythonを 使用して 書かれたPython IDEです。

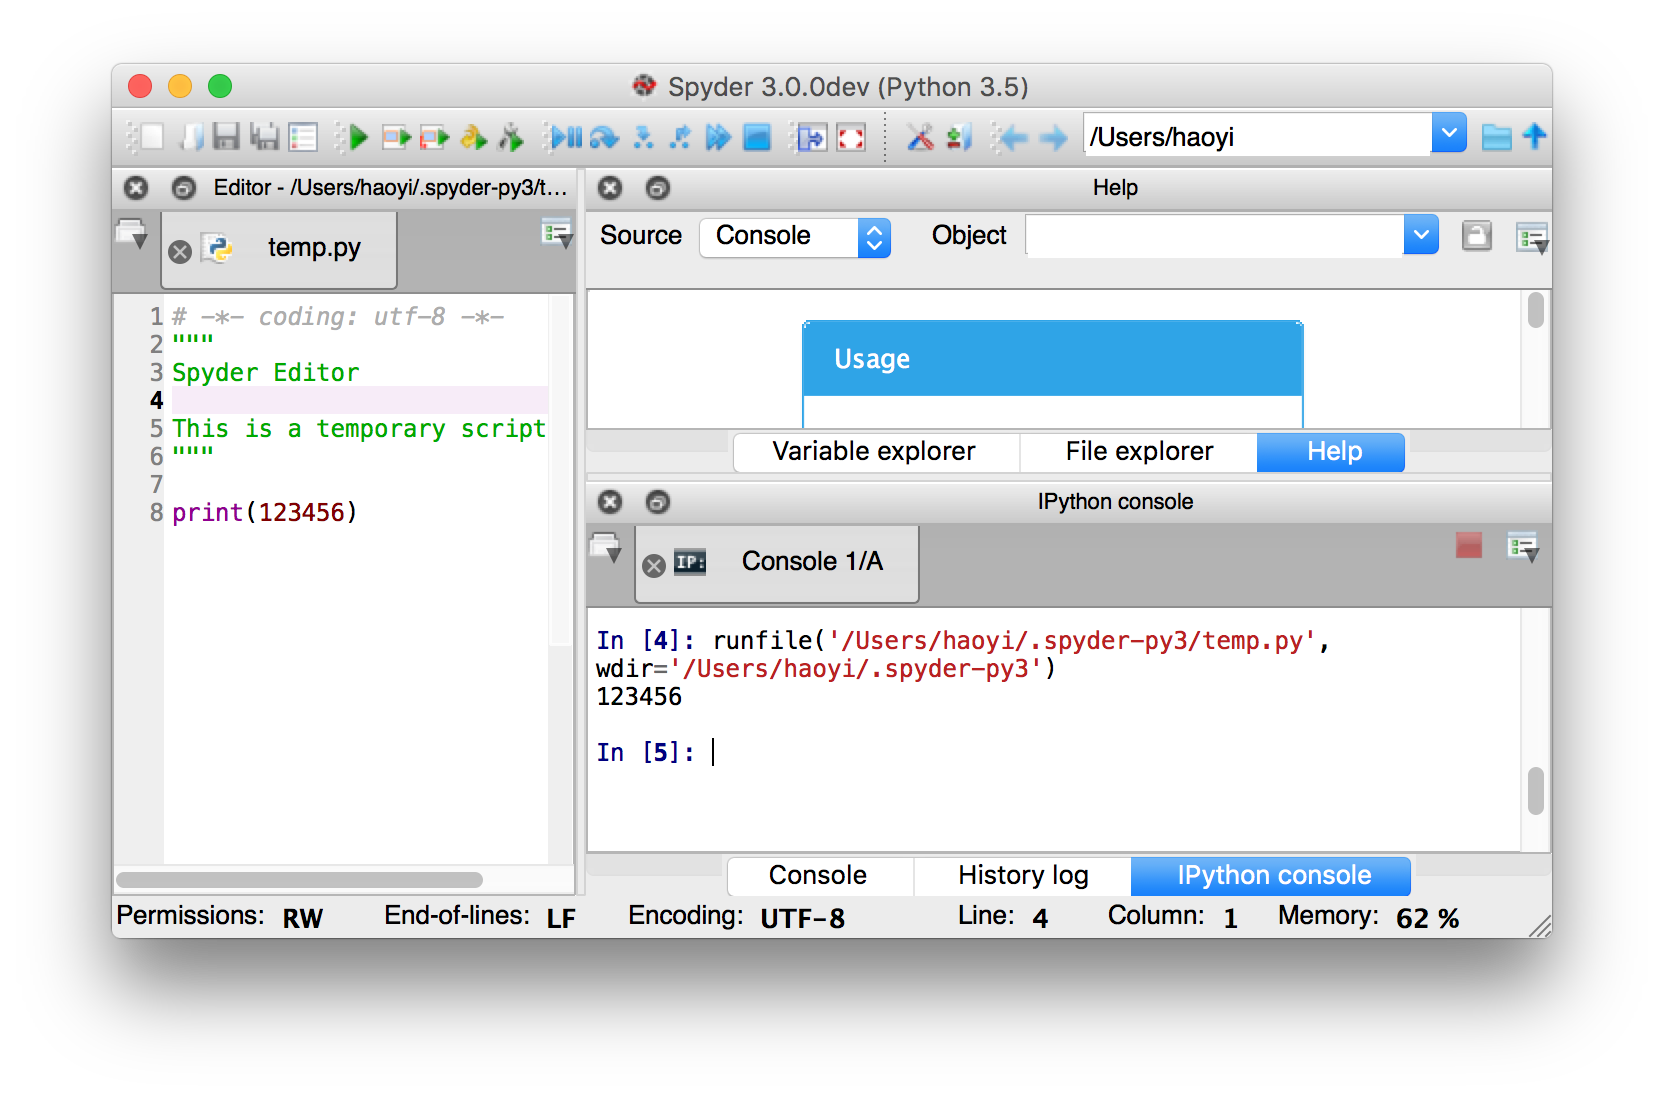
ご覧の通り、左側にはコードエディタ、右下にはIPython Notebook のようにグラフィカル出力に対応した IPython REPL (表示用の In [1] シンタックスがあるのが分かります)、そして右上にはドキュメントブラウザがあります。それ以外は典型的なIDEと同じです。上部のボタンを使うと、コードの保存、ロード、コピー、実行、デバッグ、ステップスルーができます。ドロップダウンメニューには、さらに多くの機能があり、タブの付いたテキストエディタにはハイライトされたシンタックスなどが表示されています。
Spyderは一般的には、どのプラットフォーム上でも動作します。ドキュメントには、 Windowsのほぼ全てのバージョン 、 Mac OS-X 、 Linux (Ubuntu、Debian、Arch、Fedoraなど)用の説明が含まれています。
なかなか古そう(数年前のもの)に見えますが、非常に活発なプロジェクトで、たくさんの人に支えられています。
営利目的の組織が支援しているのかは分かりませんが、個人向けの怪しげなプロジェクトではありません。
ここまでが、特に知識のない素人から見たSpyderの簡単な概要です。では次に、Macbook上でSpyderを動かしてみましょう。
インストール
試してみたいプロジェクトがある場合、まず最初にどのようにしてそれを「開発モード」でインストールするかを考えなければなりません。通常、プロジェクトには、プロジェクト内で作業するエンドユーザがダウンロードしやすい全てを含んだカプセル化された配布版があります。しかし、そのプロジェクトを基に作業する人が必ずしも使いたいバージョンとは限りまん。Spyderの場合、次の2つのセクションが区別されているようです。
ただIDEが欲しいエンドユーザであれば、インストールの手順に従います。しかし、Spyderを単に使うのではなく、変更を加えたいのでソースコードで実行を始めます。こちらの方がどんな時でも難しく、使いやすいとは言えない上、「パッケージ」された配布版よりも時間がかかります。いずれにせよ、コードに変更を加えてみたい人はこの困難をいつかは乗り越えなければならないので、さっさと片付けてしまいましょう。
どのプロジェクトにおいても共通することですが、まず依存性をダウンロードする必要があります。Spyderは外部の影響を受けやすく、 依存性 のセクションに次のような記述があります。
- Python 2.7 あるいは3.3+。
- PyQt5 5.2+あるいはPyQt4 4.6+:PyQt5が推奨です。
- qtconsole: 強化されたPythonのインタプリタ。
- Rope と Jedi: エディタコード補完、calltips機能やgo-to-definition機能。
- Pyflakes: 即時コード解析。
- Sphinx: ヘルプウィンドウのリッチテキストモード。
- Pygments: シンタックスのハイライト機能が全てのファイルタイプに対応。
- Pylint: 静的コード解析。
- Pep8: スタイル解析。
- Psutil: CPUおよびメモリ使用量のステータスバー。
- Nbconvert: Editorでのノードブックの操作。
- Qtawesome: FontAwesomeをベースにしたアイコンのテーマ
- Pickleshare: Pythonのコンソールでインポートの完了を表示。
- PyZMQ: 非同期でイントロスペクションサービスを実行。
とても長いリストです。Pythonが何かを理解していますが、それ以外の機能については把握できていません。大体においては、上の依存性を1つずつ pip と呼ばれるPythonのパッケージマネージャを使ってインストールすることができます。しかし、 依存性 のセクションの最初に目に付く場所にちょっとした免責事項が記述されています。
- 重要 事項:下に列挙されている依存性全部ではありませんが、ほとんどはAnacondaやWinPython、Python(x,y)に付いてくるので、Scientific Pythonディストリビューションをインストールする時に別途これらをインストールする必要はありません。
1つの塊としてダウンロードしてインストールできるようです。個人的にこの「Scientific Pythonディストリビューション」を使ったことがありませんが、聞いたことはあります。これは、ダウンロードできるPythonパッケージで、使い勝手の良いライブラリなどが含まれたものだそうです。今回はSpyderがどのパッケージをダウンロードしても必要なものは入手できると教えてくれています。そのため、次のステップはどれかをダウンロードして試してみることです。まずはAnacondaを試してみましょう。
Anaconda
私はMacbook ProでOS-Xを使っています。「Anaconda OS-X」(OS-X用Anaconda)を検索すると以下のようなダウンロードのページの候補が表示されます。

Anacondaインストールのページに行くと、まず、 Get Superpowers with Anaconda (Anacondaですごい力を得よう)と表示されますが、私には無意味なので無視します。 OS-X のリンクがありますので、そちらをクリックするとインストーラのダウンロードができます。

とりあえずここではPython 2.7ではなくPython 3.5のコマンドラインのダウンロードをします。ダウンロードのリンクの下に始める際の説明が次のように記述されています。
コマンドラインインストーラ
1.コマンドラインインストーラをダウンロードしてください。
2.ターミナルのウィンドウに次のどちらかを入力し、指示に従ってください。Python 2.7:bash Anaconda2-2.5.0-MacOSX-x86_64.shPython 3.5:bash Anaconda3-2.5.0-MacOSX-x86_64.sh
注:bashシェルを使っていなくても「bash」コマンドは必ず含むようにしてください。
3.オプション:MD5を使ってデータの整合性を確認してください。
Anacondaの容量は大きい(200メガバイト以上です)ので、ダウンロードに3、4分かかります。指示どおり、インストーラにコマンドラインを入力すると、数分かかるダウンロードとインストールが実行されます。
$ bash ../Downloads/Anaconda3-2.5.0-MacOSX-x86_64.sh

Welcome to Anaconda3 2.5.0 (by Continuum Analytics, Inc.)

In order to continue the installation process, please review the license agreement.
Please, press ENTER to continue
>>>
================
Anaconda License
================
...
そして、複数の質問に対し yes や ENTER を入力していくと次のように表示され終了します。
...
Prepending PATH=/Users/haoyi/anaconda3/bin to PATH in
newly created /Users/haoyi/.bash_profile

For this change to become active, you have to open a new terminal.

Thank you for installing Anaconda3!

Share your notebooks and packages on Anaconda Cloud!
Sign up for free: https://anaconda.org
ただちに anaconda を実行できるわけではなく、 python3 コマンドは変更されていないようです。
haoyi-mbp:test haoyi$ anaconda
-bash: anaconda: command ```not found

haoyi-mbp:test haoyi$ python3
Python 3.4.2 (default, Feb 10 2015, 03:38:22)
[GCC 4.2.1 Compatible Apple LLVM 6.0 (clang-600.0.56)] on darwin
Type "help", "copyright", "credits" or "license" for more information.
>>>
インストールの出力で新しいターミナルを開かないと使えないと記述されているので、上は恐らく想定されていることです。新たにターミナルを開いて anaconda を実行すると次のように表示されます。
haoyi-mbp:~ haoyi$ anaconda
usage: anaconda [-h] [--show-traceback] [--hide-traceback] [-v] [-q] [--color]
                [--no-color] [-V] [-t TOKEN] [-s SITE]
                ...
anaconda: error: A sub command must be given. To show all available sub commands, run:

     anaconda -h
はっきり 何が とは分かりませんが、インストールができました。 python3 を実行すると、次のように表示されます。
$ python3
Python 3.5.1 |Anaconda 2.5.0 (x86_64)| (default, Dec  7 2015, 11:24:55)
[GCC 4.2.1 (Apple Inc. build 5577)] on darwin
Type "help", "copyright", "credits" or "license" for more information.
>>>
紹介バナーに Anaconda があるので、Anacondaのインストールも無事成功したようです。指示の最後の点である「MD5を使ってデータの整合性の確認」については、 YOLO (人生一度きり)なので、リスクは承知で思い切ってここでは置いておきます。
Spyderに戻る
Anacondaが整ったので、 ソースコードで実行 の部分に戻りましょう。ヘッダーの下の依存性について書かれている部分の前に次のような記述があります。
Spyderを最短で実行する方法は、gitを使ってソースコードを入手し、PyQt5またはPyQt4をインストールして次のコマンドを実行することです。
- 実行時の依存性をインストール(下記参照)
cd /your/spyder/git-clonepython bootstrap.pyこれは、Spyderのバグ修正や新機能追加、使用方法の習得、または単にSpyderをいじってみることにした場合などに使うといいでしょう。
恐らくここではSpyderのリボジトリのクローンを作り、 cd (ディレクトリの移動)するよう要求されています。では、Githubページに列挙されたURLを使ってやってみましょう。

$ git clone git@github.com:spyder-ide/spyder.git
Cloning into 'spyder'...
remote: Counting objects: 43311, done.
remote: Compressing objects: 100% (393/393), done.
remote: Total 43311 (delta 263), reused 0 (delta 0), pack-reused 42918
Receiving objects: 100% (43311/43311), 28.27 MiB | 3.53 MiB/s, done.
Resolving deltas: 100% (33096/33096), done.
Checking connectivity... done.
もしこの記事の内容を追随したいのであれば、記事を書いている現段階のコミットである以下をお使いください。
そして、 cd (ディレクトリを移動)して実行します。
$ python3 bootstrap.py
Executing Spyder from source checkout
Revision df9577c, Branch: master
01. Patched sys.path with /Users/haoyi/test/spyder
02. No PyQt5 or PyQt4 detected, using PySide if available (deprecated)
Traceback (most recent call last):
  File "/Users/haoyi/test/spyder/spyderlib/qt/__init__.py", line 62, in <module>
    from PySide import __version__  # analysis:ignore
ImportError: No module named 'PySide'

During handling of the above exception, another exception occurred:

Traceback (most recent call last):
  File "bootstrap.py", line 140, in <module>
    versions = get_versions(reporev=False)
  File "/Users/haoyi/test/spyder/spyderlib/__init__.py", line 65, in get_versions
    import spyderlib.qt
  File "/Users/haoyi/test/spyder/spyderlib/qt/__init__.py", line 65, in <module>
    raise ImportError("Spyder requires PyQt5, PyQt4 or PySide (deprecated) "
ImportError: Spyder requires PyQt5, PyQt4 or PySide (deprecated) to be installed
$
「下に列挙されている依存性全部ではありませんが、ほとんどは Anaconda が付いてくる…」と記載されていましたが、記載どおり、 全部 ではなく、 ほとんど でした。これはいいとして、 pip3 を使ってPyQt5をインストールします(これは、githubのリードミーで「お勧め」されています)。 pip3 はPython 3用の python3 実行ファイル対応の pip で、Anacondaに付いてきます。
PyQt5からPySideへ
$ pip3 install PyQt5
You are using pip version 6.0.8, however version 8.1.0 is available.
You should consider upgrading via the 'pip install --upgrade pip' command.
Collecting PyQt5
  Could not find any downloads that satisfy the requirement PyQt5
  No distributions at all found for PyQt5
$
ダメですね。「pip install PyQt5」で検索すると次が表示されます。
一瞬pipを使ってもこのライブラリをPyPIからインストールできないように思えますが、さらに「osx pyqt5」を検索すると次が表示されます。
tar コマンドや make をコマンドラインに手動でひたすら入力する以外に簡単にPyQt5をインストールする方法がないかのように思えます。その一方で、上のコードで PySide モジュールが廃止になったとのエラーメッセージが表示されていましたが、大丈夫かもしれません。今は廃止警告を気にせず、とにかく何か(何でも)動けばいいと思っています。「pip install pyside」を検索すると、このモジュールの標準モジュールリポジトリのページを探索できます。
初めは pip3 を使ってインストールができるようですが、しばらくすると次のように失敗に終わってしまいます。
$ pip3 install PySide
You are using pip version 6.0.8, however version 8.1.0 is available.
You should consider upgrading via the 'pip install --upgrade pip' command.
Collecting PySide
  Downloading PySide-1.2.4.tar.gz (9.3MB)
    100% |################################| 9.3MB 69kB/s
    Removing /private/var/folders/xw/4lw_p32d0pg88hyg5rfn7vqxqhkgj_/T/pip-build-8_5xp5w9/PySide/pyside_package
    package init file 'pyside_package/PySide/__init__.py' not found (or not a regular file)
    package init file 'pyside_package/pysideuic/__init__.py' not found (or not a regular file)
Installing collected packages: PySide
  Running setup.py install for PySide
    Removing /private/var/folders/xw/4lw_p32d0pg88hyg5rfn7vqxqhkgj_/T/pip-build-8_5xp5w9/PySide/pyside_package
    Python architecture is 64bit
    error: Failed to find cmake. Please specify the path to cmake with --cmake parameter.
    Complete output from command /usr/local/opt/python3/bin/python3.4 -c "import setuptools, tokenize;__file__='/private/var/folders/xw/4lw_p32d0pg88hyg5rfn7vqxqhkgj_/T/pip-build-8_5xp5w9/PySide/setup.py';exec(compile(getattr(tokenize, 'open', open)(__file__).read().replace('\r\n', '\n'), __file__, 'exec'))" install --record /var/folders/xw/4lw_p32d0pg88hyg5rfn7vqxqhkgj_/T/pip-ugoc2jah-record/install-record.txt --single-version-externally-managed --compile:
    Removing /private/var/folders/xw/4lw_p32d0pg88hyg5rfn7vqxqhkgj_/T/pip-build-8_5xp5w9/PySide/pyside_package

    running install

    running build

    Python architecture is 64bit

    error: Failed to find cmake. Please specify the path to cmake with --cmake parameter.

    ----------------------------------------
    Command "/usr/local/opt/python3/bin/python3.4 -c "import setuptools, tokenize;__file__='/private/var/folders/xw/4lw_p32d0pg88hyg5rfn7vqxqhkgj_/T/pip-build-8_5xp5w9/PySide/setup.py';exec(compile(getattr(tokenize, 'open', open)(__file__).read().replace('\r\n', '\n'), __file__, 'exec'))" install --record /var/folders/xw/4lw_p32d0pg88hyg5rfn7vqxqhkgj_/T/pip-ugoc2jah-record/install-record.txt --single-version-externally-managed --compile" failed with error code 1 in /private/var/folders/xw/4lw_p32d0pg88hyg5rfn7vqxqhkgj_/T/pip-build-8_5xp5w9/PySide
cmake を実行しようとすると存在しないと表示されてしまいます。
$ cmake
-bash: cmake: command not found
多分パッケージマネージャ( brew )を使って単純に cmake をインストールすれば問題ないのかもしれません。では、 brew install cmake で試してみましょう。
$ brew install cmake
==> Downloading http://www.cmake.org/files/v3.1/cmake-3.1.2.tar.gz
######################################################################## 100.0%
==> Downloading https://pypi.python.org/packages/source/S/Sphinx/Sphinx-1.2.3.tar.gz
######################################################################## 100.0%
==> python -c import setuptools... --no-user-cfg install --prefix=/private/tmp/cmake-Kp5igT/cmake-3.1
==> Downloading https://pypi.python.org/packages/source/d/docutils/docutils-0.12.tar.gz
######################################################################## 100.0%
==> python -c import setuptools... --no-user-cfg install --prefix=/private/tmp/cmake-Kp5igT/cmake-3.1
==> Downloading https://pypi.python.org/packages/source/P/Pygments/Pygments-2.0.2.tar.gz
######################################################################## 100.0%
==> python -c import setuptools... --no-user-cfg install --prefix=/private/tmp/cmake-Kp5igT/cmake-3.1
==> Downloading https://pypi.python.org/packages/source/J/Jinja2/Jinja2-2.7.3.tar.gz
######################################################################## 100.0%
==> python -c import setuptools... --no-user-cfg install --prefix=/private/tmp/cmake-Kp5igT/cmake-3.1
==> Downloading https://pypi.python.org/packages/source/M/MarkupSafe/MarkupSafe-0.23.tar.gz
######################################################################## 100.0%
==> python -c import setuptools... --no-user-cfg install --prefix=/private/tmp/cmake-Kp5igT/cmake-3.1
==> ./bootstrap --prefix=/usr/local/Cellar/cmake/3.1.2 --system-libs --parallel=8 --no-system-libarch
==> make
==> make install
/usr/local/Cellar/cmake/3.1.2: 1821 files, 29M, built in 5.1 minutes
苦痛の5分間が過ぎてやっと実行できたようです。 cmake コマンドで以下の内容が出力できるようになりました。
$ cmake
Usage

  cmake [options] <path-to-source>
  cmake [options] <path-to-existing-build>

Specify a source directory to (re-)generate a build system for it in the
current working directory.  Specify an existing build directory to
re-generate its build system.

Run 'cmake --help' for more information.
では再度 pip3 install PySide を試してみましょう。
$ pip3 install PySide
You are using pip version 6.0.8, however version 8.1.0 is available.
You should consider upgrading via the 'pip install --upgrade pip' command.
Collecting PySide
  Using cached PySide-1.2.4.tar.gz
    Removing /private/var/folders/xw/4lw_p32d0pg88hyg5rfn7vqxqhkgj_/T/pip-build-dx05oahd/PySide/pyside_package
    package init file 'pyside_package/PySide/__init__.py' not found (or not a regular file)
    package init file 'pyside_package/pysideuic/__init__.py' not found (or not a regular file)
Installing collected packages: PySide
  Running setup.py install for PySide
    Removing /private/var/folders/xw/4lw_p32d0pg88hyg5rfn7vqxqhkgj_/T/pip-build-dx05oahd/PySide/pyside_package
    Python architecture is 64bit
    error: Failed to find qmake. Please specify the path to qmake with --qmake parameter.
    Complete output from command /usr/local/opt/python3/bin/python3.4 -c "import setuptools, tokenize;__file__='/private/var/folders/xw/4lw_p32d0pg88hyg5rfn7vqxqhkgj_/T/pip-build-dx05oahd/PySide/setup.py';exec(compile(getattr(tokenize, 'open', open)(__file__).read().replace('\r\n', '\n'), __file__, 'exec'))" install --record /var/folders/xw/4lw_p32d0pg88hyg5rfn7vqxqhkgj_/T/pip-ln1fsrej-record/install-record.txt --single-version-externally-managed --compile:
    Removing /private/var/folders/xw/4lw_p32d0pg88hyg5rfn7vqxqhkgj_/T/pip-build-dx05oahd/PySide/pyside_package

    running install

    running build

    Python architecture is 64bit

    error: Failed to find qmake. Please specify the path to qmake with --qmake parameter.

    ----------------------------------------
    Command "/usr/local/opt/python3/bin/python3.4 -c "import setuptools, tokenize;__file__='/private/var/folders/xw/4lw_p32d0pg88hyg5rfn7vqxqhkgj_/T/pip-build-dx05oahd/PySide/setup.py';exec(compile(getattr(tokenize, 'open', open)(__file__).read().replace('\r\n', '\n'), __file__, 'exec'))" install --record /var/folders/xw/4lw_p32d0pg88hyg5rfn7vqxqhkgj_/T/pip-ln1fsrej-record/install-record.txt --single-version-externally-managed --compile" failed with error code 1 in /private/var/folders/xw/4lw_p32d0pg88hyg5rfn7vqxqhkgj_/T/pip-build-dx05oahd/PySide
この qmake とは一体なのでしょうか。 brew install は使えません。
$ brew install qmake
Error: No available formula for qmake
Searching formulae...
Searching taps...
pyside qmake osx を検索すると次が表示されます。
ここでは、 Xcode をインストールするように言っていまが、すでにインストール済みです。その後にマジックコマンドの入力があります。
brew install python qt cmake はインストール済みですし、 python もAnacondaのセクションでインストール済みです。そのため、ここで必要になるのは、 qt で qmake コマンドを使えるようにすることです。 brew install qt を入力します。
$ brew install qt
==> Downloading https://download.qt.io/official_releases/qt/4.8/4.8.6/qt-everywhere-opensource-src-4.

curl: (22) The requested URL returned error: 403 Forbidden
Trying a mirror...
==> Downloading http://qtmirror.ics.com/pub/qtproject/official_releases/qt/4.8/4.8.6/qt-everywhere-op
######################################################################## 100.0%
==> Downloading https://raw.githubusercontent.com/DomT4/scripts/440e3cafde5bf6ec6f50cd28fa5bf89c280f1
######################################################################## 100.0%
==> Patching
patching file src/gui/dialogs/qcolordialog_mac.mm
patching file src/gui/dialogs/qfiledialog_mac.mm
patching file src/gui/dialogs/qfontdialog_mac.mm
patching file src/gui/kernel/qapplication_mac.mm
patching file src/gui/kernel/qcocoaapplication_mac.mm
patching file src/gui/kernel/qcocoaapplicationdelegate_mac.mm
Hunk #4 succeeded at 295 (offset -13 lines).
Hunk #5 succeeded at 342 (offset -13 lines).
patching file src/gui/kernel/qcocoaapplicationdelegate_mac_p.h
patching file src/gui/kernel/qcocoamenuloader_mac.mm
patching file src/gui/kernel/qcocoasharedwindowmethods_mac_p.h
patching file src/gui/kernel/qeventdispatcher_mac.mm
patching file src/gui/kernel/qt_cocoa_helpers_mac.mm
patching file src/gui/kernel/qwidget_mac.mm
patching file src/gui/styles/qmacstyle_mac.mm
patching file src/gui/util/qsystemtrayicon_mac.mm
patching file src/gui/widgets/qcocoamenu_mac.mm
patching file src/gui/widgets/qmenu_mac.mm
==> ./configure -prefix /usr/local/Cellar/qt/4.8.6 -system-zlib -qt-libtiff -qt-libpng -qt-libjpeg -c
==> make
2 errors generated.
make[2]: *** [.obj/release-shared/qpaintengine_mac.o] Error 1
make[2]: *** Waiting for unfinished jobs....
make[1]: *** [release] Error 2
make: *** [sub-gui-make_default-ordered] Error 2

READ THIS: http://git.io/brew-troubleshooting
タイムアウトか何かでインストールができなかったようです。この時点ではまだ qmake を実行できません。 brew install qt timing out を検索すると次が出てきます。
https://github.com/Homebrew/homebrew/issues/30843つまり、私だけが直面する問題ではないようです。もしかしたら、再実行すれば大丈夫なのかもしれません。もしできない場合は PyQt5 を先ほどと同じように、指示通りに再インストールしてみましょう。
今回もまたダメだったようです。
==> ./configure -prefix /usr/local/Cellar/qt/4.8.6 -system-zlib -qt-libtiff -qt-libpng -qt-libjpeg -c
==> make
2 errors generated.
make[2]: *** [.obj/release-shared/qpaintengine_mac.o] Error 1
make[2]: *** Waiting for unfinished jobs....
make[1]: *** [release] Error 2
make: *** [sub-gui-make_default-ordered] Error 2

READ THIS: http://git.io/brew-troubleshooting
PyQt5に戻る
今はPySideのことは諦めましょう。理由は分かりませんが、インストールがうまくいきません。どちらにしろ、 qt を要求しているようですね。おそらく PyQt4 が要求しているものと大差ないでしょう。
今回もネットで「osx PyQt5」を検索してみると、こんなものがありました。
このパッケージはMac OS用のPyQt5があらかじめビルドされているバージョンをインストールするものです。既にコンパイルされたものを使用するため、これ自体は何もコンパイルしません。
これでうまくいくのでしょうか? コンパイルを避けるということは、 brew install qt をする間に make コマンドを走らせている時、コンパイルのタイムアウトらしきものを避けるということに違いありません。思うに、コンパイルを必要とする PyQt5 をインストールしようとするメカニズムはどれも qt が必要で、結局同じタイムアウトの問題にぶつかるのではないでしょうか。どちらにしても、これはうまくインストールできたようです。
$ pip3 install pyqt5-macos-built
You are using pip version 6.0.8, however version 8.1.0 is available.
You should consider upgrading via the 'pip install --upgrade pip' command.
Collecting pyqt5-macos-built
  Downloading pyqt5-macos-built-5.5.0.tar.gz (5.1MB)
    100% |################################| 5.1MB 124kB/s
    /usr/local/Cellar/python3/3.4.2_1/Frameworks/Python.framework/Versions/3.4/lib/python3.4/distutils/dist.py:260: UserWarning: Unknown distribution option: 'bugtrack_url'
      warnings.warn(msg)
Collecting docopt (from pyqt5-macos-built)
  Downloading docopt-0.6.2.tar.gz
Installing collected packages: docopt, pyqt5-macos-built
  Running setup.py install for docopt
  Running setup.py install for pyqt5-macos-built
    changing mode of build/scripts-3.4/pyqt5_macos_built.py from 644 to 755
    /usr/local/Cellar/python3/3.4.2_1/Frameworks/Python.framework/Versions/3.4/lib/python3.4/distutils/dist.py:260: UserWarning: Unknown distribution option: 'bugtrack_url'
      warnings.warn(msg
    changing mode of /usr/local/bin/pyqt5_macos_built.py to 755
Successfully installed docopt-0.6.2 pyqt5-macos-built-5.5.0
奇妙なことに、 python3 bootstrap.py を実行しようとすると、 PyQt5 が見つからないといって処理に失敗するようです。 python3 のREPLではうまくインポートできるのに、おかしいですね。
$ python3 bootstrap.py
Executing Spyder from source checkout
Revision df9577c, Branch: master
01. Patched sys.path with /Users/haoyi/test/spyder
02. PyQt5 is detected, selecting
Traceback (most recent call last):
  File "/Users/haoyi/test/spyder/spyderlib/qt/__init__.py", line 62, in <module>
    from PySide import __version__  # analysis:ignore
ImportError: No module named 'PySide'

During handling of the above exception, another exception occurred:

Traceback (most recent call last):
  File "bootstrap.py", line 140, in <module>
    versions = get_versions(reporev=False)
  File "/Users/haoyi/test/spyder/spyderlib/__init__.py", line 65, in get_versions
    import spyderlib.qt
  File "/Users/haoyi/test/spyder/spyderlib/qt/__init__.py", line 65, in <module>
    raise ImportError("Spyder requires PyQt5, PyQt4 or PySide (deprecated) "
ImportError: Spyder requires PyQt5, PyQt4 or PySide (deprecated) to be installed
$ python3
Python 3.4.2 (default, Feb 10 2015, 03:38:22)
[GCC 4.2.1 Compatible Apple LLVM 6.0 (clang-600.0.56)] on darwin
Type "help", "copyright", "credits" or "license" for more information.
>>> import PyQt5
>>>
spyderlib/qt/__init__.py 内のインポートを実行するコードを見てみると、以下のようになっています。
if API == 'pyqt5':
    try:
        from PyQt5.QtCore import PYQT_VERSION_STR as __version__
        from PyQt5 import uic  # analysis:ignore
    except ImportError:
        API = os.environ['QT_API'] = 'pyqt'
        API_NAME = 'PyQt4'
同じファイルの下方で失敗に終わる ImportError にぶち当たりそうな気がします。試しに python3 のREPLでこのインポートを実行してみることも可能です。そして、驚いたことに失敗です。
$ python3
Python 3.4.2 (default, Feb 10 2015, 03:38:22)
[GCC 4.2.1 Compatible Apple LLVM 6.0 (clang-600.0.56)] on darwin
Type "help", "copyright", "credits" or "license" for more information.
>>> from PyQt5.QtCore import PYQT_VERSION_STR as __version__
Traceback (most recent call last):
  File "<stdin>", line 1, in <module>
ImportError: dlopen(/usr/local/lib/python3.4/site-packages/PyQt5/QtCore.so, 2): Library not loaded: /usr/local/opt/qt5/lib/QtCore.framework/Versions/5/QtCore
  Referenced from: /usr/local/lib/python3.4/site-packages/PyQt5/QtCore.so
  Reason: image not found
>>>
ついていませんね。 import PyQt5 はできそうに思えましたが、 from PyQt5.Core import PYQT_VERSION_STR as __version__ を行うのは無理そうです。一部のバイナリ依存性がきちんとインストールされていないのでしょうか。もしかしたら、 pyqt5-macos-built のパッケージには、本来必要な何かしらのQT依存性が欠けているのかもしれません。
ネットで「Library not loaded QtCore (QtCoreライブラリがロードされていない)」を検索してみたら、これを見つけました。
もしかして、 brew install qt がうまく動作しなかったら brew install qt5 が動作するのでしょうか?
これは時間がかかりすぎる気がします。 conda や pip からPythonのパッケージをインストールできることが判明しました。ネットで「Anaconda pyqt5」と検索すると下記が出てきました。
conda config --add channels dsdale24
conda install pyqt5
python3が何らかの事情でpyqt5の何かしらと互換性がないため、これはうまくいかないみたいです。 pyqt5 向けのAnacondaのパッケージはPython 2.7でしか使えないことが分かりました。
$ conda info pyqt5
Using Anaconda Cloud api site https://api.anaconda.org
Fetching package metadata: ......

pyqt5 5.3.1 py27_0
------------------
...
幸い conda には便利なコマンドがたくさんあり、中でも search コマンドは、使える可能性のある似たようなものを探すのに一役買ってくれます。
$ conda
usage: conda [-h] [-V] [--debug] command ...

conda is a tool for managing and deploying applications, environments and packages.

Options:

positional arguments:
  command
    info         Display information about current conda install.
    help         Displays a list of available conda commands and their help
                 strings.
    list         List linked packages in a conda environment.
    search       Search for packages and display their information. The input
                 is a Python regular expression. To perform a search with a
                 search string that starts with a -, separate the search from
                 the options with --, like 'conda search -- -h'. A * in the
                 results means that package is installed in the current
                 environment. A . means that package is not installed but is
                 cached in the pkgs directory.
これで pyqt のPython 3で動作するバージョンを見つけられるでしょうか?
$ conda search pyqt
Using Anaconda Cloud api site https://api.anaconda.org
Fetching package metadata: ......
pyqt                         4.10.4                   py26_0  defaults
                             4.10.4                   py27_0  defaults
                             4.10.4                   py33_0  defaults
                             4.10.4                   py34_0  defaults
                             4.11.3                   py26_0  defaults
                             4.11.3                   py27_0  defaults
                             4.11.3                   py33_0  defaults
                             4.11.3                   py34_0  defaults
                             4.11.3                   py35_0  defaults
                             4.11.4                   py27_0  defaults
                             4.11.4                   py34_0  defaults
                             4.11.4                   py35_0  defaults
                             4.11.4                   py27_1  defaults
                             4.11.4                   py34_1  defaults
                          *  4.11.4                   py35_1  defaults
pyqt5                        5.3.1                    py27_0  dsdale24
pyqtgraph                    0.9.10                   py27_0  defaults
                             0.9.10                   py34_0  defaults
                             0.9.10                   py35_0  defaults
                             0.9.10                   py27_1  defaults
                             0.9.10                   py34_1  defaults
                             0.9.10                   py35_1  defaults
pyqt には py35_0 (私たちのです)向けのパッケージがあるようです。 pyqt5 にはないですけれどね。代わりにこれをダウンロードしてみましょうか。
pyqt (バージョン4)を使うとうまくいきそうです。
$ conda install pyqt
Using Anaconda Cloud api site https://api.anaconda.org
Fetching package metadata: ......
Solving package specifications: ..........................
Package plan for installation in environment /Users/haoyi/anaconda3:

The following packages will be downloaded:

    package                    |            build
    ---------------------------|-----------------
    openssl-1.0.2g             |                0         3.0 MB
    xz-5.0.5                   |                1         173 KB
    setuptools-20.2.2          |           py35_0         458 KB
    wheel-0.29.0               |           py35_0          82 KB
    conda-4.0.4                |           py35_0         188 KB
    pip-8.1.0                  |           py35_0         1.6 MB
    ------------------------------------------------------------
                                           Total:         5.4 MB

The following packages will be UPDATED:

    conda:      3.19.1-py35_0 --> 4.0.4-py35_0
    openssl:    1.0.2f-0      --> 1.0.2g-0
    pip:        8.0.2-py35_0  --> 8.1.0-py35_0
    setuptools: 19.6.2-py35_0 --> 20.2.2-py35_0
    wheel:      0.26.0-py35_1 --> 0.29.0-py35_0
    xz:         5.0.5-0       --> 5.0.5-1

Proceed ([y]/n)? y

Fetching packages ...
openssl-1.0.2g 100% |#####################################################| Time: 0:00:08 393.54 kB/s
xz-5.0.5-1.tar 100% |#####################################################| Time: 0:00:00 184.22 kB/s
setuptools-20. 100% |#####################################################| Time: 0:00:01 238.96 kB/s
wheel-0.29.0-p 100% |#####################################################| Time: 0:00:00 102.15 kB/s
conda-4.0.4-py 100% |#####################################################| Time: 0:00:00 199.95 kB/s
pip-8.1.0-py35 100% |#####################################################| Time: 0:00:02 673.73 kB/s
Extracting packages ...
[      COMPLETE      ]|########################################################################| 100%
Unlinking packages ...
[      COMPLETE      ]|########################################################################| 100%
Linking packages ...
[      COMPLETE      ]|########################################################################| 100%
$
これでbootstrapのスクリプトを実行した時にクラッシュすることはなさそうです。
$ python3 bootstrap.py
Executing Spyder from source checkout
Revision df9577c, Branch: master
01. Patched sys.path with /Users/haoyi/test/spyder
02. PyQt4 is detected, selecting
03. Imported Spyder 3.0.0dev
    [Python 3.5.1 64bits, Qt 4.8.7, PyQt4 (API v2) 4.11.4 on Darwin]
04. Running Spyder
いや、そうでもないかもしれません。
Bootstrap completed in 00:00:13.3716
Traceback (most recent call last):
  File "bootstrap.py", line 162, in <module>
    start.main()
  File "/Users/haoyi/test/spyder/spyderlib/app/start.py", line 118, in main
    from spyderlib.app import spyder
  File "/Users/haoyi/test/spyder/spyderlib/app/spyder.py", line 99, in <module>
    from spyderlib.utils.qthelpers import qapplication
  File "/Users/haoyi/test/spyder/spyderlib/utils/qthelpers.py", line 16, in <module>
    import spyderlib.utils.icon_manager as ima
  File "/Users/haoyi/test/spyder/spyderlib/utils/icon_manager.py", line 14, in <module>
    import qtawesome as qta
ImportErro
r: No module named 'qtawesome'
これは一体何でしょう? conda install ができるようには思えません。しかし、ビルトインの検索機能を使ったところ、期待の持てそうなものが出てきました。
$ conda install qtawesome
Using Anaconda Cloud api site https://api.anaconda.org
Fetching package metadata: ......
Solving package specifications: .
Error:  Package missing in current osx-64 channels:
  - qtawesome

You can search for this package on anaconda.org with

    anaconda search -t conda qtawesome
$ anaconda search -t conda qtawesome
Using Anaconda Cloud api site https://api.anaconda.org
Run 'anaconda show <USER/PACKAGE>' to get more details:
Packages:
     Name                      |  Version | Package Types   | Platforms
     ------------------------- |   ------ | --------------- | ---------------
     lightmotif/qtawesome      |   0.1.10 | conda           | win-32
                                          : FontAwesome icons in PyQt and PySide applications
     spyder-ide/qtawesome      |    0.2.0 | conda           | None-None
                                          : Iconic fonts in PyQt and PySide applications
Found 2 packages
これをどうやってインストールすればいいのでしょう?
ネットで qtawesome を検索したら、こういうものが見つかりました。
Qt向けの FontAwesome みたいなもののようですね。きっとこれは矢印などの見た目を良くするために作られたのだと思います。
pip3 を使ったインストールはうまくいきそうです。 pip3 でのインストールは、 conda install を使うのといくらか違うのでしょうか。とにかく、 pip3 は成功しました。
$ pip3 install QtAwesome
You are using pip version 6.0.8, however version 8.1.0 is available.
You should consider upgrading via the 'pip install --upgrade pip' command.
Collecting QtAwesome
  Downloading QtAwesome-0.3.1-py2.py3-none-any.whl (149kB)
    100% |################################| 151kB 2.7MB/s
Collecting qtpy (from QtAwesome)
  Downloading QtPy-0.1.3-py2.py3-none-any.whl
Collecting six (from QtAwesome)
  Using cached six-1.10.0-py2.py3-none-any.whl
Installing collected packages: six, qtpy, QtAwesome


Successfully installed QtAwesome-0.3.1 qtpy-0.1.3 six-1.10.0
しかし、インポートしようとすると実際には動きません。
$ python3
Python 3.5.1 |Anaconda 2.5.0 (x86_64)| (default, Dec  7 2015, 11:24:55)
[GCC 4.2.1 (Apple Inc. build 5577)] on darwin
Type "help", "copyright", "credits" or "license" for more information.
>>> import qtawesome
Traceback (most recent call last):
  File "<stdin>", line 1, in <module>
ImportError: No module named 'qtawesome'
>>>
ネットで conda install "qtawesome" を検索したら(単語が切り離されてしまわないようクオーテーションが必須です)、こちらが見つかりました。
* https://anaconda.org/lightmotif/qtawesome
これはうまくいきません。
$ conda install -c https://conda.anaconda.org/lightmotif qtawesome
Using Anaconda Cloud api site https://api.anaconda.org
Fetching package metadata: ........
Solving package specifications: .
Error:  Package missing in current osx-64 channels:
  - qtawesome

You can search for this package on anaconda.org with

    anaconda search -t conda qtawesome
しかし、 anaconda search で先に列挙されていた”他の” foo/qtawesome の名前を使うことで、機能します。
$ conda install -c https://conda.anaconda.org/spyder-ide qtawesome
Using Anaconda Cloud api site https://api.anaconda.org
Fetching package metadata: ........
Solving package specifications: ..........

Package plan for installation in environment /Users/haoyi/anaconda3:

The following packages will be downloaded:

    package                    |            build
    ---------------------------|-----------------
    qtpy-1.0b1                 |             py_0          10 KB
    qtawesome-0.2.0            |             py_0         146 KB
    ------------------------------------------------------------
                                           Total:         156 KB

The following NEW packages will be INSTALLED:

    qtawesome: 0.2.0-py_0
    qtpy:      1.0b1-py_0

Proceed ([y]/n)? y

Fetching packages ...
qtpy-1.0b1-py_ 100% |#####################################################| Time: 0:00:00  38.93 kB/s
qtawesome-0.2. 100% |#####################################################| Time: 0:00:01 106.19 kB/s
Extracting packages ...
[      COMPLETE      ]|########################################################################| 100%
Linking packages ...
[      COMPLETE      ]|########################################################################| 100%
こうして python3 bootstrap.py を終えて、やっと起動することができました。
いや、できていないかもしれません。
Bootstrap completed in 00:00:01.8318
Traceback (most recent call last):
  File "/Users/haoyi/test/spyder/spyderlib/app/spyder.py", line 3130, in main
    mainwindow = run_spyder(app, options, args)
  File "/Users/haoyi/test/spyder/spyderlib/app/spyder.py", line 3026, in run_spyder
    main.post_visible_setup()
  File "/Users/haoyi/test/spyder/spyderlib/app/spyder.py", line 1316, in post_visible_setup
    self.report_missing_dependencies()
  File "/Users/haoyi/test/spyder/spyderlib/app/spyder.py", line 1322, in report_missing_dependencies
    missing_deps = dependencies.missing_dependencies()
  File "/Users/haoyi/test/spyder/spyderlib/dependencies.py", line 108, in missing_dependencies
    if not dependency.check() and not dependency.optional:
  File "/Users/haoyi/test/spyder/spyderlib/dependencies.py", line 46, in check
    self.installed_version)
  File "/Users/haoyi/test/spyder/spyderlib/utils/programs.py", line 429, in is_module_installed
    actver = get_module_version(module_name)
  File "/Users/haoyi/test/spyder/spyderlib/utils/programs.py", line 371, in get_module_version
    mod = __import__(module_name)
  File "/Users/haoyi/anaconda3/lib/python3.5/site-packages/jedi/__init__.py", line 41, in <module>
    from jedi.api import Script, Interpreter, NotFoundError, set_debug_function
  File "/Users/haoyi/anaconda3/lib/python3.5/site-packages/jedi/api/__init__.py", line 16, in <module>
    from jedi.parser import Parser, load_grammar
  File "/Users/haoyi/anaconda3/lib/python3.5/site-packages/jedi/parser/__init__.py", line 21, in <module>
    from jedi.parser import tree as pt
  File "/Users/haoyi/anaconda3/lib/python3.5/site-packages/jedi/parser/tree.py", line 39, in <module>
    from jedi import cache
  File "/Users/haoyi/anaconda3/lib/python3.5/site-packages/jedi/cache.py", line 32, in <module>
    from jedi import debug
  File "/Users/haoyi/anaconda3/lib/python3.5/site-packages/jedi/debug.py", line 17, in <module>
    init()
  File "/Users/haoyi/anaconda3/lib/python3.5/site-packages/colorama/initialise.py", line 37, in init
    wrap_stream(orig_stdout, convert, strip, autoreset, wrap)
  File "/Users/haoyi/anaconda3/lib/python3.5/site-packages/colorama/initialise.py", line 76, in wrap_stream
    convert=convert, strip=strip, autoreset=autoreset)
  File "/Users/haoyi/anaconda3/lib/python3.5/site-packages/colorama/ansitowin32.py", line 67, in __init__
    strip = conversion_supported or (not wrapped.closed and not is_a_tty(wrapped))
AttributeError: 'SysOutput' object has no attribute 'closed'
ネットでこのエラーメッセージを検索したら、次のものが見つかりました。
解決策は以下のどちらかのようです。
pip install colorama==0.3.5conda install colorama=0.3.3
この問題について投稿した人たちのどちらを信じるかによりますね。1つ目の方はうまくいきそうもありませんが、2つ目はうまくいきそうです。Spyderが立ち上がります。
こんなものが出てしまいました。
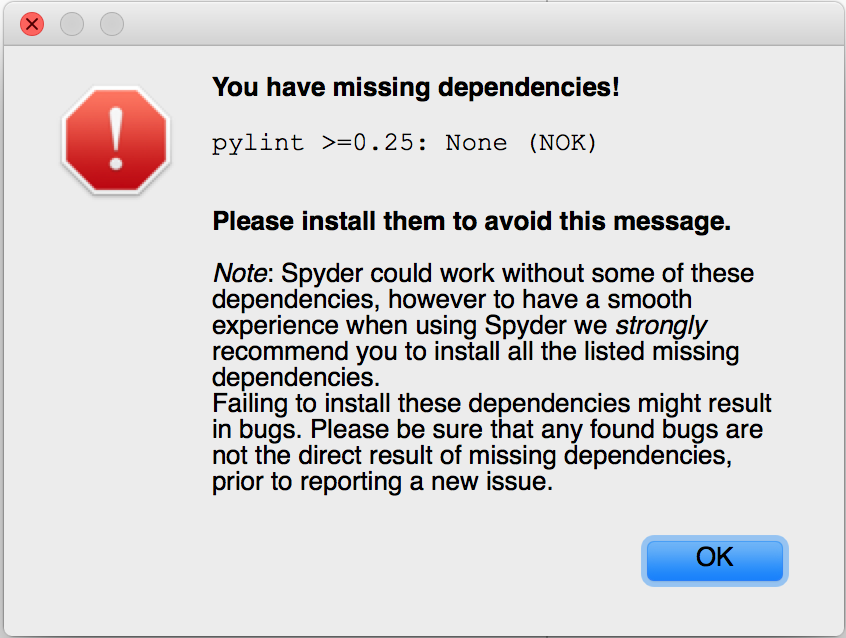
しかしこれは単に conda install pylint をすれば、機能するようになります。
これをある程度長い時間(2~3分?)そのまま走らせておいたら、下記のようになって終わることに気付きました。
Segmentation fault: 11ですから完全に安定しているわけではないのです。しかし私たちが変更の実行とテストを行う分には十分です。ということで、ここではよしとしましょう。
私がSpyderの「Scientific Python」IDEへの変更を最初に試み始めてから、ここまでで約2時間が経ちました。ついに「開発」モードでソースから立ち上げることができたのです。外部のコードベースを理解しようとする時、これは最も重要なステップです。ここまで私たちは、依存性がうまく機能しない理由を見つけ出そうとして1、2回コードをちらっと見ただけです。次のステップでは、コードの何がどうなっているのかを探るため、コードを詳しく見ていきましょう。
この記事の後編はこちら: 他人の書いたコードに挑もう – Part 2
article originally written by Li Haoyi on http://www.lihaoyi.com/post/DivingIntoOtherPeoplesCode.html

株式会社リクルート プロダクト統括本部 プロダクト開発統括室 グループマネジャー 株式会社ニジボックス デベロップメント室 室長 Node.js 日本ユーザーグループ代表
- X: @yosuke_furukawa
- Github: yosuke-furukawa
関連記事