2016年6月1日
Pingの発展版 : httping, dnsping, smtpping
(2016-05-10)by Johannes Weber
本記事は、原著者の許諾のもとに翻訳・掲載しております。
私はpingが大好きです!簡単に使えて、ネットワークが稼働しているかを直接明らかにできます。 「 Pingはセキュリティの欠陥ではない!(むしろ友達である) 」、「 Traceroute上級 」の記事をご参照ください。少なくとも、外行きのping(trust(=信頼されるゾーン)からunstrust(=そうでないゾーン)へ)はセキュリティ上の心配なしに用いられるべきです。しかし、これらのuntrustからDMZへのICMPエコー・リクエストは多くの会社で拒否されているため、すべてのサーバが起動・稼働しているかをテストするのが困難になっています。
私は、顧客のサイトのDMZファイアウォールの置き換えに取り組んでいました。当然ながら私は「すべてのサーバが適切に接続されているか(NAT)」「ファイアウォールが接続を許可しているか(ポリシー)」を(外部から)知ろうとしました。 そこで私は、さまざまなレイヤーでの7つのpingツールを使い、(サーバだけでなく)サービスが稼働しているかどうかを明らかにすることができました。これらのツールは、HTTP, DNS, SMTP(ICMPエコー・リクエストの代わり)のセッションを生成するものです。素晴らしいですね!
この投稿では、Linuxマシン上での httping, dnsping, smtppingのインストールと使用方法 について示していきます。私のケースでは、キャプチャしたセッションからの Wireshark のスクリーンショットと同様に、 Ubuntu server 14.04.4 LTSを利用しています。
httping
その名の通り、 httpingはHTTPリクエストを送ります。 スペルの中に”P”が一つしか含まれていないことの注意してください。このツールは GitHub から入手可能です。 ここ でもこのツールについての情報が得られます。インストールのプロセスは以下のようになります:
sudo apt-get install libncursesw5-dev libssl-dev libfftw3-dev gettext
git clone https://github.com/flok99/httping.git
cd httping/
sudo make install
(ただの sudo apt-get install httping ではhttpingの古いバージョンが得られてしまうので、お勧めしません。)
基本的な機能としては、 httping blog.webernetz.net というように、オプションとしてホスト名だけを必要とします。 他にも多くのオプションが利用できて、SSL/TLSでのHTTPSもサポートしています。例:
weberjoh@jw-nb12:~$ httping blog.webernetz.net
PING blog.webernetz.net:80 (blog.webernetz.net):
connected to 80.237.133.136:80 (400 bytes), seq=0 time=381.24 ms
connected to 80.237.133.136:80 (400 bytes), seq=1 time=394.30 ms
connected to 80.237.133.136:80 (400 bytes), seq=2 time=373.54 ms
connected to 80.237.133.136:80 (400 bytes), seq=3 time=370.39 ms
connected to 80.237.133.136:80 (400 bytes), seq=4 time=396.91 ms
^CGot signal 2
--- blog.webernetz.net ping statistics ---
5 connects, 5 ok, 0.00% failed, time 6408ms
round-trip min/avg/max = 370.4/383.3/396.9 ms
weberjoh@jw-nb12:~$
weberjoh@jw-nb12:~$
weberjoh@jw-nb12:~$
weberjoh@jw-nb12:~$ httping -6 https://www.insinuator.net/
Auto enabling SSL due to https-URL
PING www.insinuator.net:443 (/):
connected to [2003:60:4010:11b0::12]:443 (279 bytes), seq=0 time=685.03 ms
connected to [2003:60:4010:11b0::12]:443 (279 bytes), seq=1 time=712.15 ms
connected to [2003:60:4010:11b0::12]:443 (279 bytes), seq=2 time=631.81 ms
connected to [2003:60:4010:11b0::12]:443 (279 bytes), seq=3 time=722.95 ms
^CGot signal 2
--- https://www.insinuator.net/ ping statistics ---
4 connects, 4 ok, 0.00% failed, time 6228ms
round-trip min/avg/max = 631.8/688.0/723.0 ms
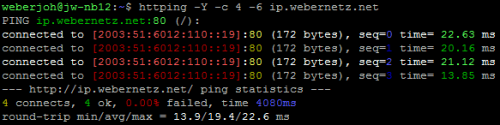
weberjoh@jw-nb12:~$以下の画像の1枚目は color mode (-Y) 、–threshold-red、–threshold-yellowパラメータ(私はこれを好みます)でのhttpingのスクリーンショットです。2,3枚目は Wireshark のスクリーンショットで、片方はhttpセッション(SYNパケットとHEADリクエスト、200 OKの返答がありますね)、もう片方はhttpsセッションでのものです。

カラーモードでのhttping
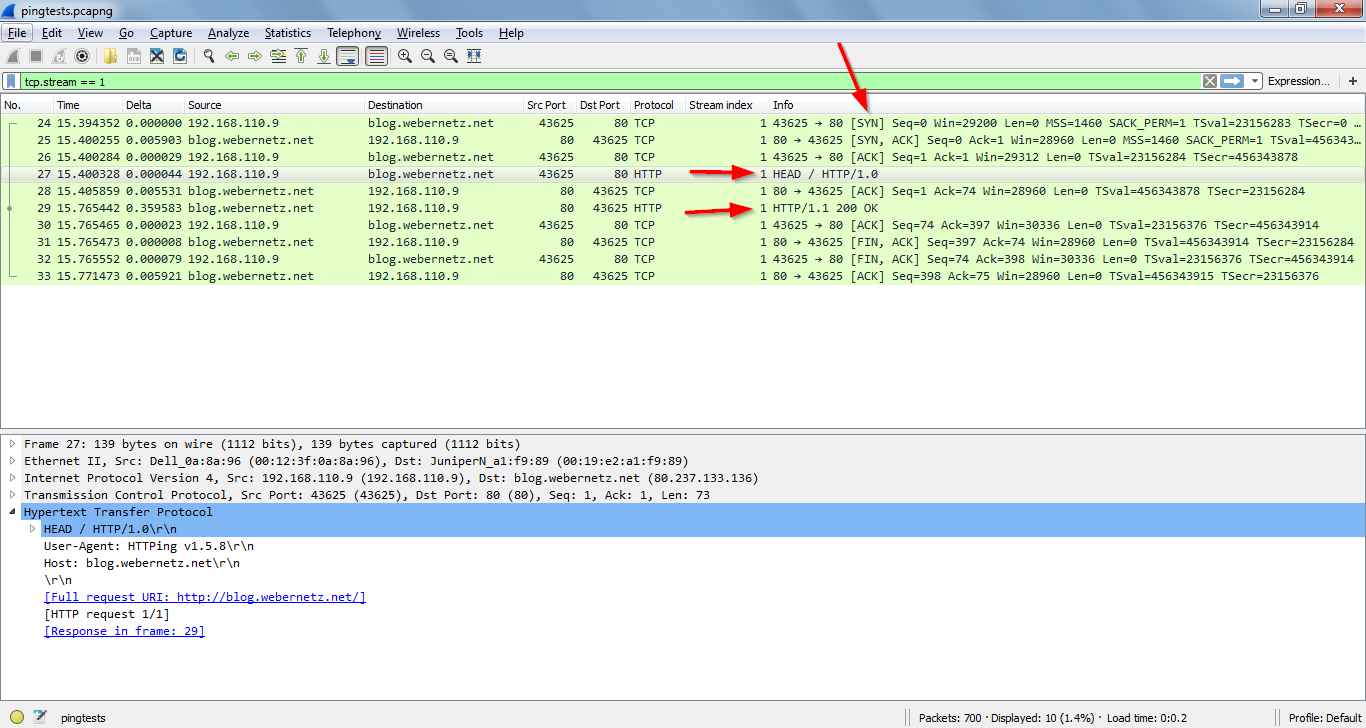
httpホストへのhttping
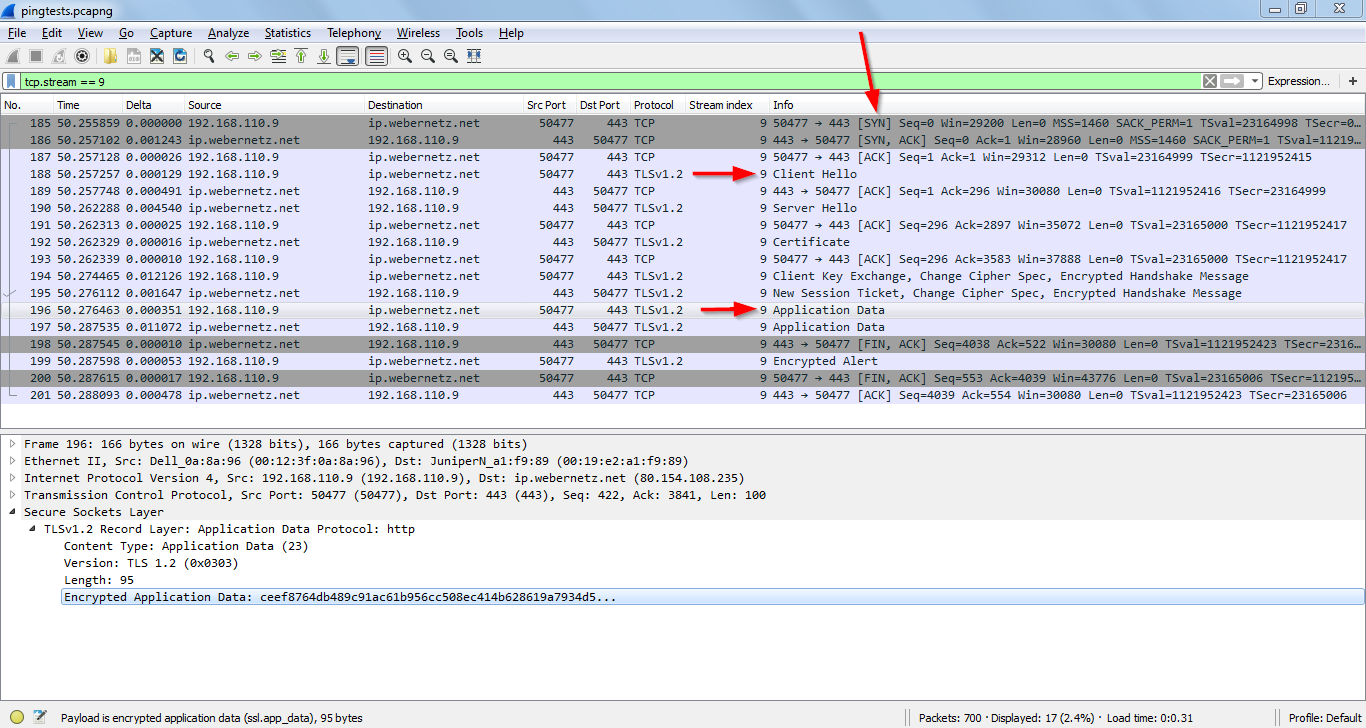
httpsホストへのhttping
dnsping
DNSDiag toolkit の一部であるdnspingは GitHub から入手可能で、DNSクエリを送信するものです。 インストールするには以下のコマンドを用います。:
git clone https://github.com/farrokhi/dnsdiag.git
cd dnsdiag/
git submodule update --init
他に何もオプションをつけなければ、dnspingはデフォルトのDNSサーバ(/etc/resolv.conf)に対してホスト名についてのタイプAのクエリを送信します。 しかし、DNSサーバ(-s SERVER)やクエリのタイプ(-t TYPE)に関するオプションも利用できます。
weberjoh@jw-nb12:~$ cd dnsdiag/
weberjoh@jw-nb12:~/dnsdiag$ ./dnsping.py blog.webernetz.net
dnsping.py 8.8.8.8: hostname=blog.webernetz.net rdatatype=A
45 bytes from 8.8.8.8: seq=0   time=17.682 ms
44 bytes from 8.8.8.8: seq=1   time=15.788 ms
45 bytes from 8.8.8.8: seq=2   time=31.627 ms
45 bytes from 8.8.8.8: seq=3   time=32.032 ms
45 bytes from 8.8.8.8: seq=4   time=16.608 ms
45 bytes from 8.8.8.8: seq=5   time=15.957 ms
44 bytes from 8.8.8.8: seq=6   time=16.467 ms
45 bytes from 8.8.8.8: seq=7   time=32.676 ms
45 bytes from 8.8.8.8: seq=8   time=16.101 ms
45 bytes from 8.8.8.8: seq=9   time=28.697 ms

--- 8.8.8.8 dnsping statistics ---
10 requests transmitted, 10 responses received,   0% lost
min=15.788 ms, avg=22.364 ms, max=32.676 ms, stddev=7.739 ms
weberjoh@jw-nb12:~/dnsdiag$
weberjoh@jw-nb12:~/dnsdiag$
weberjoh@jw-nb12:~/dnsdiag$
weberjoh@jw-nb12:~/dnsdiag$ ./dnsping.py -s ns1.weberdns.de -t aaaa pa.weberdns.de
dnsping.py DNS: 2003:51:6012:110::22:53, hostname: pa.weberdns.de, rdatatype: aaaa
48 bytes from 2003:51:6012:110::22: seq=0   time=11.289 ms
48 bytes from 2003:51:6012:110::22: seq=1   time=2.408 ms
48 bytes from 2003:51:6012:110::22: seq=2   time=1.933 ms
48 bytes from 2003:51:6012:110::22: seq=3   time=1.881 ms
48 bytes from 2003:51:6012:110::22: seq=4   time=1.911 ms
48 bytes from 2003:51:6012:110::22: seq=5   time=1.859 ms
48 bytes from 2003:51:6012:110::22: seq=6   time=1.889 ms
48 bytes from 2003:51:6012:110::22: seq=7   time=1.846 ms
48 bytes from 2003:51:6012:110::22: seq=8   time=1.888 ms
48 bytes from 2003:51:6012:110::22: seq=9   time=1.867 ms

--- 2003:51:6012:110::22 dnsping statistics ---
10 requests transmitted, 10 responses received,   0% lost
min=1.846 ms, avg=2.877 ms, max=11.289 ms, stddev=2.960 ms

weberjoh@jw-nb12:~/dnsdiag$
Wireshark では、以下のように見えます。
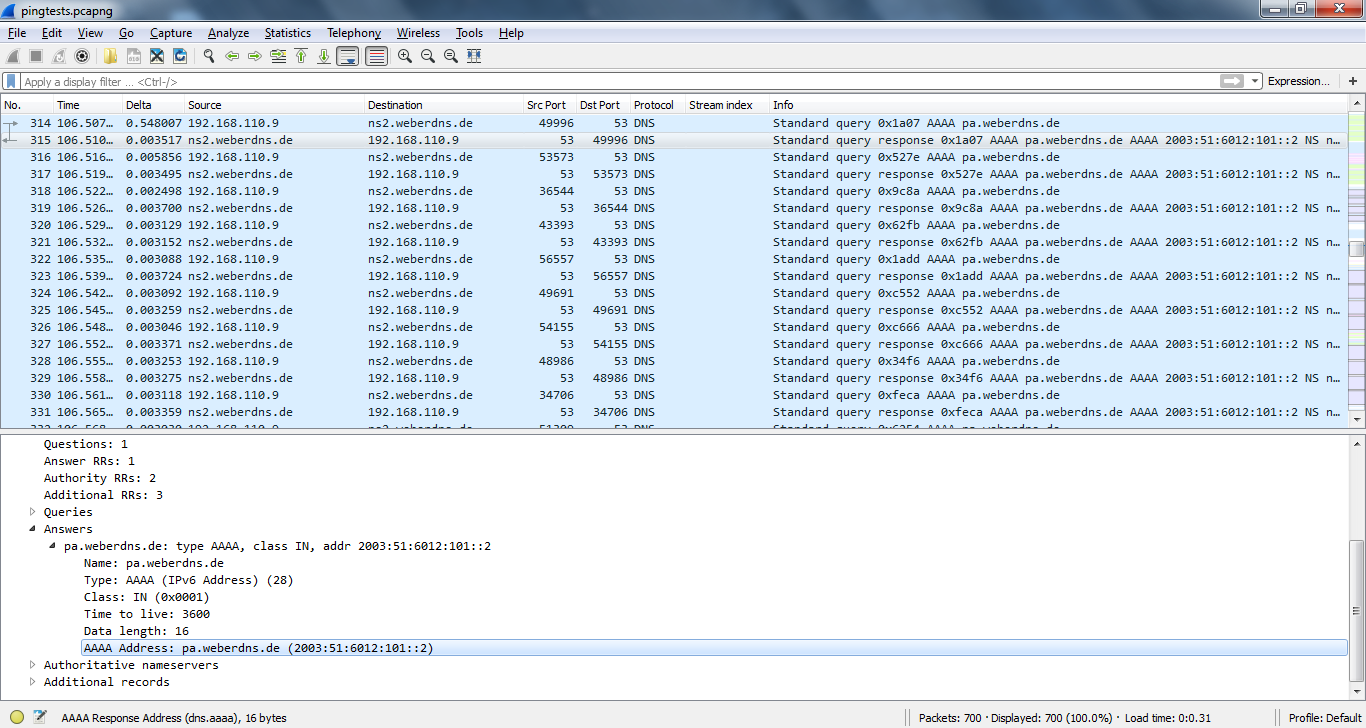
dnsping Wireshark
(DNSDiag kitに含まれるほかの2つのツール、 dnseval.py と dnstraceroute.py にも注目してみてください。)
smtpping
最後に、 smtppingはテストメールを送信します。 . デフォルトでは”無制限に”メールを送信してしまうので、 -c オプションを使うのを忘れないように注意しましょう。こちらも GitHub で入手可能です。インストールのコマンドは以下の通りです。
git clone https://github.com/halonsecurity/smtpping.git
cd smtpping/
cmake .
make
Wireshark, Cisco ESA, Thunderbird でのこれらのテストメールのスクリーンショットが以下です。スクリーンショットの説明をご参照ください:
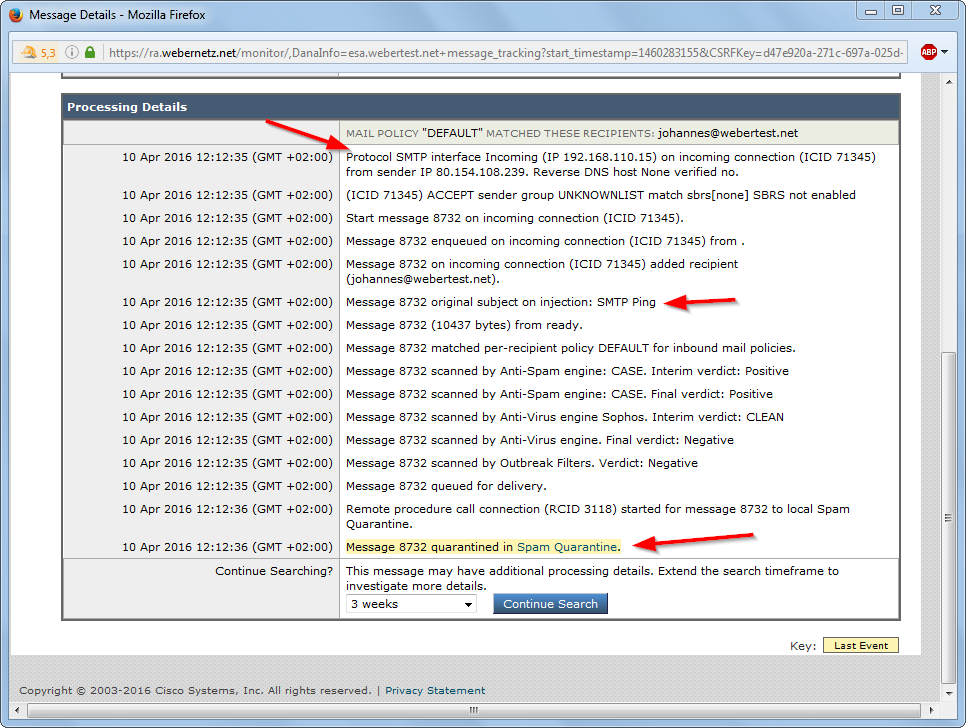
もし送信者(-S mail@address.foo)が設定されていないと、メールのゲートウェイがメッセージをスパムと判定することがあります。Cisco ESA アプライアンスの例。

テストメールはThunderbirdではこう表示されます。

Wiresharkがsmtppingをキャプチャしたところ。 SYN, クリアテキストでのメール, FIN。
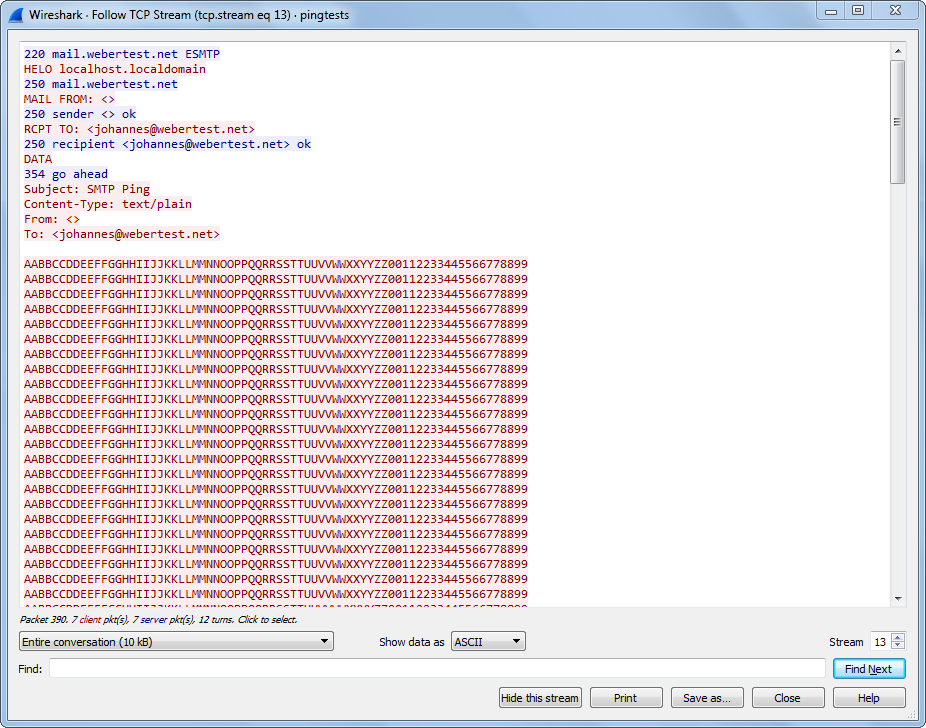
WiresharkのFollow TCP Stream。(1/2)
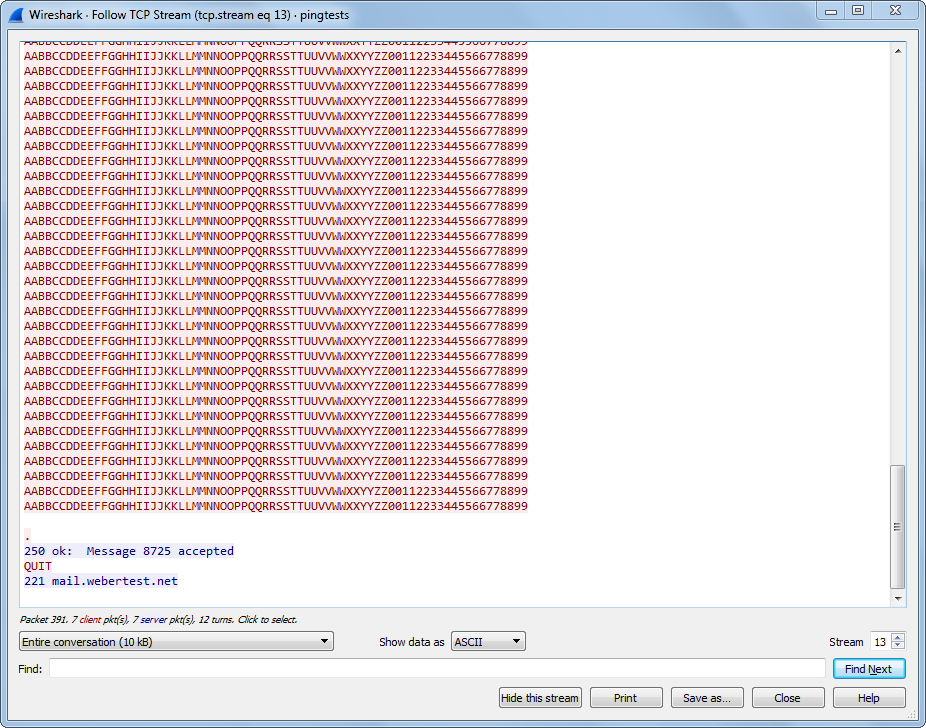
WiresharkのFollow TCP Stream。(2/2)
終わりに
私はこれらのツールにとても満足しています。 これらは使いやすく、ネットワークやファイアウォールの設定を変えている間にサービスをモニタリングする助けになります。また、これらのツールは同時に「pingを拒否することがよいセキュリティのアプローチだ」と信じてやまないセキュリティ管理者に対するよい反論にもなるのです。それでは!

株式会社リクルート プロダクト統括本部 プロダクト開発統括室 グループマネジャー 株式会社ニジボックス デベロップメント室 室長 Node.js 日本ユーザーグループ代表
- X: @yosuke_furukawa
- Github: yosuke-furukawa
関連記事